Saturday, October 30, 2010

And the Winner Is!

And the winner of our random drawing for a free pattern or the Embroidery Book is .........Heather! I loved reading all of the sewing memories and hope that you can take the time to read a few of them. Heather, e-mail me through the website, so that we can get your free gift in the mail!

heather said...
i smocked my first dress for my 6 months old daughter ( she just turned 35!]. It was a Style pattern and had iron on dots. It was made of light blue polyester dotted swiss and I used white, pink ,yellow, green and purple floss. I used nylon lace to edge the neck and sleeves and I thought it was beautiful. I proudly had her photo taken in it. I still have that little dress. I look at it now and see all its imperfections , Now I make smocked dresses for my little grand babies using a pleater, cotton heirloom fabrics, french lace and a more restrained color palette but I keep that little blue dress to remind me of my first baby and of how very young I was .

I am creating my own new sewing memory this weekend. Anna and I leave Monday morning to teach in Baton Rouge and New Orleans all of next week, grandbaby is due in 10 days and just found out that she will barely weigh 5 lbs.! I stayed up late and got up early to sew a white little daygown in a preemie/newborn size that I can priority ship as we leave town. I couldn't stand the thought that I had not made anything small enough for her to wear! For those of you who are wondering, I have plans to fly to Arizona when she is a month old. I hope that by then she will be big enough that I will be comfortable holding her!!!

Michie'

Wednesday, October 27, 2010

Baby Bishop Details

Here are a few details about the "First Baby Dress." The fabric is white Imperial Batiste and I edged the sleeves with lace scraps from my stash. I usually do three rows of baby wave stitches on the sleeves.

I added the Madeira hem to add a little elegance to the dress. I drafted the scallops using my Lace Shaping board. Intending to have the Madeira hem turned to the inside of the dress, I goofed and it ended up on the outside! This happens more often than you would believe.... After experimenting with a few stitches I decided to leave the hem as it was and stitched the scallops in place using a simple Applique Stitch. It is a little plain compared to using a Pin Stitch, but is more in keeping with the older style dresses. I couldn't believe how fast it went using a simple stitch!

This also answers the question, can you still save money sewing? I don't count the cost of the pattern since I use them over and over, so the cost for the fabric and lace was barely over $10! If you have had the fabric and lace for over a year (which was the case here) you might want to consider the project FREE!

Don't forget the "Free Giveaway" which ends Friday night!

Michie'

Sunday, October 24, 2010

First Baby Dress

Do you have an unusual memory attached to a sewing project? I do now! The day before we left for South Korea I suddenly decided that at some point I might wish that I had packed some handwork. So, I stuffed a white batiste bishop that I had pleated a few days before, floss, and needles in my suitcase. I told Rex that I might not even get it out, but in case of an emergency (in my case that would be time stuck in a hotel room) I was ready. As it happened I smocked almost the entire dress while waiting for #3 son to come pick us up in the mornings. I now have very strong memories attached to the dress of the view from our hotel window in Seoul and watching "Tom and Jerry" cartoons in Korean! Since Tom and Jerry never say anything I had no problem at all following along. When was the last time you had the chance to laugh along with Tom and Jerry?

Here is the completed dress! I never dreamed a year ago when I was drafting pattern #135, that I would be needing it myself a year later. So, this is officially the first dress that I have made for the expected granddaughter who is due in just two and a half weeks! I always like to start the new baby out in white and added the Madiera hem to make it a little more special.

Do you have a special memory tied to a sewing project? If you do, I would love to hear it, so let's have a Free Giveaway! You will win the pattern or book of your choice!

Here are the rules.

* Post a comment, on this post only. No e-mails, please. And, you may only post once.

* Tell us your most memorable sewing story. Were you on vacation, snow bound, or just really excited about what you were working on?

* Your time to enter will end this Friday night at midnight. I will randomly draw a name Saturday morning. You can check Saturday's post to see who the lucky winner is. I will then contact the winner, to find out which pattern (or the embroidery book) you would like. This will also give you time to see which pattern you would like to add to your stash! Good Luck!

Michie'

Friday, October 22, 2010

The Baby Quilt is Finished!

The baby quilt is finished 3 weeks before the due date! Miracles do still happen! I bought the fabric the week that they announced that they were applying for adoption. I picked out fabric that would work for a boy or a girl and went ahead and started on the embroidered squares. Piecing is not my favorite part, so I set up the card table in the den and put the sewing machine on it one Saturday and sewed while we watched old movies.


I felt like I was getting over anxious when I went ahead and started on the hand quilting and it was 100 degrees outside, but Rex encouraged me to go ahead and start, "Because you never know what could happen!" About halfway through the quilting process they called to tell us that they had a match for a baby, so I picked up speed. Rex loves when I have a quilt to work on. He remembers his Mom quilting when he was very little and he knows that I can stand to sit through ballgames if I have handwork! I loved every minute that I worked on it and will never forget how special it was to make a quilt for the first grand baby. As chance would have it, I was ready to attach the binding the day that they called to tell us that the due date had been moved up 3 weeks.

November 9th can't get here soon enough and I'm glad that I had the nerve to use some girl colors!

Michie'


Monday, October 18, 2010

Pleating Corduroy

Can you pleat corduroy? If you use the right kind of corduroy it pleats up beautifully. I always make sure that I use Featherwale corduroy, because it is soft enough that it goes through the pleater without putting stress on the needles.

Because of the bulk of the fabric there are a few things that you need to take into consideration. The pleats will not press together as tightly as other fabric, so you will need to take out some of the pleats. When pleating an insert or dress front, I pull out as many pleats as needed when sizing and tying off so that the pleated piece will lay flat when stitched to the yoke.

I have also made some very pretty bishops out of corduroy. Once again, because of the bulk, adjustments need to be made when cutting out the dress. I take out about 2" from the front and back centers of the dress when cutting out and about 1" from the center of each sleeve. This ensures that there is not more fullness at the neck edge than the neck band can accommodate.

Michie'

Friday, October 15, 2010

Pleating Question Answered

I was asked to give a little more detail about the inserts that I like to pleat up ahead of time. I generally use Imperial Broadcloth because is soft enough for pleating but also has enough body that it is suitable for Geometric or Picture Smocking. The standard length of fabric for a pleated insert is 45" long and I like to pleat 10 rows since I am rarely smocking anything that calls for more than 8 rows of smocking.

The smocked insert in the picture is for baby playsuit pattern #123 that I will be teaching at Martha Pullen School. You are instructed in this pattern to pleat a strip of fabric 36" long.

After a very busy day, I started smocking last night thinking that I would only get a few rows done, but I actually completed the whole thing in 3 hours! I know.....who sits and smocks for 3 hours! I was just soooo close to being done that I couldn't put it down. :) It is an original design of simple 3 step waves.

Michie'

Wednesday, October 13, 2010

Pleating

I'll have to admit that I do not like to pleat the fabric for smocking. I have a great pleater that I have had for 21 years and we are on good terms, but I will put off pleating as long as possible! My pleater sits in it's original box on the shelf right next to my cutting table, so it IS convenient. And no longer are the days when I have to search the house for the wooden dowel because it might have become a ninja warrior sword or a princess wand. So, my only excuse is that pleating is not really fun! Like anything else, pleating does get easier with practise, and you need to ALWAYS use good quality fabric that does not put strain on the needles.

Not long ago while pleating an insert I though how nice it would be to have a basket of already pleated inserts and bishops. The light bulb in my head went off, and I am now trying to always pleat more than one thing when I have the pleater out! My basket now has a few pleated inserts ready for smocking and soon I will add a few bishops in various sizes and colors for the new expected grand baby!


Although the thought of pleating doesn't make my heart beat faster, a pleated insert and floss to match my fabric does!!! This morning I pleated the two inserts that I need to finish up my samples for Martha Pullen School and after consulting my DMC floss chart made a trip to Hobby Lobby for floss. I am now ready for some evenings of smocking!


Do you have a trick to help make pleating less of a chore?

Michie'

Monday, October 11, 2010

Your Smile for the Day

How can any momma look at this picture and not smile? This is our #1 son. He always payed attention while I sewed and I knew he could do a little, but not this! He decided to make his and his wife's Halloween costumes this year!

He called a little while ago to give me updated news on the baby girl adoption. All is going well, and they just found out that the scheduled birth of the baby has been moved up 3 WEEKS! So, we are now looking at Nov. 9th!

I better get busy!

Michie'

Friday, October 8, 2010

Vintage Dress Lesson 5

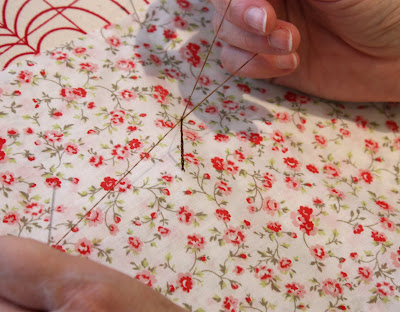
To make a sash carrier, thread a needle with thread close to the color of your fabric. The thread needs to be doubled and about 18" long. Knot the end of the thread and come up through the fabric where you would like the carrier to be. Take a small stitch in the fabric to form a loop.

Holding the loop open with one hand and holding the needle in the other, pull a loop of thread through the original loop.

Pull the loop down close to the fabric.

Continue to draw the thread from the needle through the loop.
When the loop is the desired length, run the needle through the last loop.

Insert the needle back down through the fabric and tie off on the back. And there is your sash carrier!


Michie'

Tuesday, October 5, 2010

Bishop Dress with Madeira Hem

I finally completed the bishop dress for Martha Pullen's Feb. 2011 School! The dress is made from pattern #135 and is part of the "Smocking/Construction School", where we will learn how to construct a bishop and add the Madeira hem.

The pretty pink and green print and the green gingham are both from "Sew Beautiful." The floral fabric was easy to pleat and smocked beautifully. This was a fun project to work on over the weekend during the many football games and while I was recovering from jet lag!


Michie'

Friday, October 1, 2010

Vintage Dress Lesson 4

This is one of those dresses that just needed a sash to look complete! The sash should be cut with the grain of the fabric, but I have discovered that in a "fabric emergency" no one will know the difference. Here are the basic sash measurements that I use, but you want to adjust them according to your style dress. Remember, you will be cutting two sashes

Width- 6 1/2"

Length- 12 month 26", 18 month 27", 2 years 29", 3 years 31", 4 years 33", 5 years 35"


Working with one sash at a time, right sides together, fold the fabric in half and pin the raw edges together. At one end, fold up the corner at a 90% angle and cut off the corner. Stitch a 1/4" seam across the angled corner and down the side leaving the other end open. Clip the corners, turn the sash right side out and press.

Fold the sash in half and baste the raw end of the sash to the back side seam of the dress. I like to place the sash so that it covers the back yoke edge. Now sew up the side seams and complete the dress!

Our last Vintage Dress Lesson will give directions for the thread loop to hold the sash in place.
Michie'

LinkWithin

Related Posts with Thumbnails