Saturday, January 30, 2010

I Had Rather Be Smocking

First of all, I would like to remind you that Sunday, January 31st is the LAST day to take advantage of the Anniversary Sale! The response has been awesome, and I hope everyone enjoys their new patterns!


While you are here, I'll share a story........ I have never tried to knit, have always been fascinated by it, as in, "Wow! You knit!" and thought I would give it a try. As a teacher, it is always good to be learning something new, and is a great exercise in humility. So, around Thanksgiving I bought a "Teach Yourself to Knit" kit at Hobby Lobby. First of all, I have never been able to teach myself to do ANYTHING! I always need to see it live and in person. But, with a sense of adventure I took my new knitting supplies to my daughter's house ( who also doesn't knit) and we learned how to cast on together. She then confiscated half of my supplies, and asked for a Hobby Lobby gift card for Christmas.


Off and on, when I talked to her during the Holidays she mentioned that she was knitting and several times got me unstuck over the phone, or referred me to a website with videos.


Six weeks later, when she came for my Birthday, I proudly showed her the scarf I'm working on. I have mastered Knit 1-Purl 1, and although I still feel awkward holding the needles, I have enjoyed it and am quite pleased with the results! She bragged on the choice of color and yarn quality and said that the tension was great. And then it happened....


She handed her brother the cap that she had knitted him for his Birthday! I still laugh every time I see his cap and think of how far she came as a beginner in six weeks! Wouldn't the world be a boring place, if we were all good at the same thing! I think that I will let her "shine" at knitting and I will stick to smocking.


I will be absent from the blogging world for the next week while I am busy teaching at Martha Pullen's School of Art and Fashion. I have already packed the camera, so I am looking forward to sharing pictures with you when I get back!


Friday, January 29, 2010

#103 Pattern of the Week

This weeks featured pattern is #103! The pattern includes sizes 3 - 24 month, boy or girl sleeves, and can be made with a Peter Pan collar, square collar, or an overlay.

This knicker is made from a floral print, with a white collar, which has been edged with a machine scallop stitch. The smocking design is included in the pattern.
The white on white striped fabric, along with the blue and white Whipped Stitched Piping, makes this outfit dressy enough for Easter!
I added tiny tucks and little blue buttons to dress up an otherwise plain yoke.
Featured in "Sew Beautiful Magazine", the knicker on the right features an overlay with decorative buttons, and smocking.

This sweet version, appeared in an issue of "Creative Needle Magazine" several years ago. I love how fresh the yellow fabric looks!

Are you starting to plan your Easter sewing? Are you dragging out your old magazines for inspiration? Are you anxiously waiting for the sewing shops to get in the new Spring fabrics? I would love to hear where you are in the creative process!

Right now, I am watching it begin to sleet outside, so I am having visions of "Spring weather dancing through my head!"

Thursday, January 28, 2010

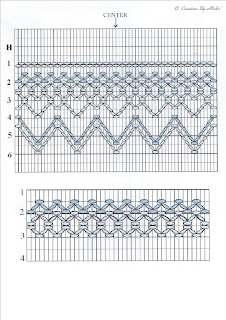
Free Smocking Design

Here is the smocking design that I promised to share! It is a beginner level design with basic cables, waves, and trellises.

The bishop design.

Row 1: Cable Stitch

Rows 1 1/2 - 3: Three rows of half row, Baby Waves

Row 3: Baby Wave, 3 step Wave Trellis

Row 4 - 5 1/2: 5 step Wave Trellis

Row 4 1/2 - 6: 5 step Wave Trellis

The sleeve design.

Rows 1 1/2 - 3: 3 rows of Baby Waves
To view a printable version, click here.

If you need a good reference book to help you get started smocking, my favorites are "The Joy of Smocking" and "A-Z Smocking."

These cold winter nights are perfect for smocking!

Tuesday, January 26, 2010

The Finished Outfit

Here it is, cute as can be! The top is a shortened version of #122 using white pique' and blue gingham. The center smocking added some color without being to much. The shorts are from pattern #121.

I added the a bias band of blue gingham to the edge of the sleeves, to add some more color.

I made piping, using baby cording, to give the collar a finished look.

This picture shows the wrong side of the neck edge. The seam allowance was trimmed down to less than 1/4", batiste was used for the neck binding, and was understitched, to help control the bulk of the pleats.

Pink gingham, puffed sleeves, and a smocked flower, would be really sweet for a little girl!

Monday, January 25, 2010

"Rubber Ducky Your the One!"

I just realize that I still know ALL the words to Sesame Street's "Rubber Ducky." I watched that show a lot in the 80's with the kids!

With that in mind, I will share a sample that I am working on for Martha Pullen School. This is a version of #122 Baby Apron, with smocking added in the center. For this sample, I cut a square piece of fabric the length of the garment front, and added 6" to the center. I then marked the center and pleated 16 rows all the way across the top.

Carefully pull out the pleater thread from each end, leaving a total of 32 pleats in the center. Draw up the pleats to about 2" and tie off the pleater threads.

I then marked the garment front onto the fabric with a water-soluble marker. Be sure, to allow for the collar before beginning the smocking! Complete your smocking, leaving in the pleater threads.

After all the smocking is complete, straight stitch around the neck edge on the marked line, then stitch again using a short and narrow zigzag stitch. Cut out the garment front next to the stitching line. You may now remove the pleater threads.

This baby apron is made from white pique' and is smocked with Ellen McCarn's "Ducklings."

Tune in tomorrow for a picture of the finished outfit!
Don't forget, this is the last week for the Anniversary Sale!

Saturday, January 23, 2010

The Birthday Girl!

That would be me!


Turning 50!


A special party is planned!


A lot of young people are coming, who also think that I am their momma!


We plan to eat cupcakes and laugh a lot!


Look at that hair on a 1 year old!


Why were my babies bald?


And that little smocked dress...no wonder I love smocking!


I hope everyone has a nice weekend. I need to go for a walk, so that I can have 2 cupcakes tonight!


Michie'

Thursday, January 21, 2010

#102 Pattern of the Week

This weeks featured pattern is the Pleated Bubble #102. This has been a top seller for the past 10 years and is one of my favorites. This bubble was featured in "Creative Needle" magazine in 2003. It is made from blue gingham with little fish embroidered on the white collar.

Made from pink Swiss baby flannel, this bubble appeared in "Creative Needle" magazine in 2001. I had no idea that it was going to be in the magazine, and I still remember how surprised and excited I was when I recognized "one of mine!"

A cute Easter outfit. This version with the round collar, is made from Imperial Broadcloth and trimmed with purchased tatting. It appeared in "Sew Beautiful" magazine several years ago.

The design and the bullion instructions for the bunny are in the "Heirloom Embroidery Book."

For something dressier, this bubble is made from sage green Dupioni Silk.

The collar is made from ecru pima cotton, and is trimmed with tiny lace and embroidery.
Made from blue and white linen, this version shows that silk ribbon can also be for boys!

It only took a few simple embroidery stitches to dress up the front pleat. The bunny's body and head are made from Straight Stitches, while his ears are Lazy Daisies, and his tail is a French Knot.

Start planning your Spring sewing now. It will be here before we know it!

Wednesday, January 20, 2010

Embroidery Questions

I had an e-mail with several embroidery questions that I would like to answer. Her first question was about this blue linen gown made from pattern #119. She wondered what stitches were used for the sheep.

The body is made from French Knots, the face is Satin Stitch, the ears and bow are Lazy Daisies, and the legs are Bullion Wraps.

The next question was about Shadow Embroidery and what size designs are suitable. Most designs under about an 1 1/2" work well. When Shadow Embroidering larger objects, you may end up with gaps where the thread did not "shadow" through the fabric. I then turn the fabric to the wrong side and weave the thread back and forth to take care of the gaps.
Pattern #113, was used for this Easter Romper, made from pale yellow pique'. I always use Imperial Batiste or pima cotton for Shadow Embroidery. The fabric must be thin enough for the thread colors to show through.

I made this Baby Apron #122, and a matching pink one for a friend who was expecting twins several years ago. It was such a sweet gift and was fast and easy to make when the babies made an early appearance!
I like to use the baby rattle design when teaching, because of the basic shapes. We start with the green circles, next the yellow band, then the rattle and bow. You can complete a basic design like this in about an hour!
This green and white pique' bubble is made using pattern #102. The size of the design matters more when choosing a Satin Stitch design. If the design is larger than 1/2", the object will need to be divided into sections and the stitches staggered.

The turtle is great for the beginner, because he is naturally divided into sections. Each plate on his shell is stitched as an individual object, then an Outline Stitch is used between the sections. All of these designs are in the "Heirloom Embroidery Book" along with the stitches.

I love to hear that you are trying something new, so don't hesitate to ask questions. I promise that someone else is wondering the same thing!

Tuesday, January 19, 2010

The Perfect Buttons

Once again, I completed a garment and then went on the search for the perfect buttons! And with a bishop that buttons down the front, the buttons really do matter. I was happy with the pale yellow fabric and blue floss, but then struggled to find pale blue buttons that were delicate enough for a newborn size dress. Fortunately, I remembered that Wendy carries the buttons that I had in mind. As you can see from the picture, I ordered more than buttons! I couldn't resist the same buttons in pink, a bag of buttons, blue and white baby pique', and a cute duck print. I can hardly wait to start on the fabric and will be sure to share the projects!

The finished bishop turned out sweet and simple for a new baby girl.

I made up the smocking design as I went along. I will share it with you in the near future in a down loadable format.

Saturday, January 16, 2010

#101 Pattern of the Week

The featured pattern of the week is #101! This was the very first pattern that I started the company with 10 years ago. Because it has a yoke that can be smocked or left plain for embroidery, it is still one of my favorites. It also has a short boy's sleeve, a puffed girl's sleeve, or a long sleeve. The daygown features a Peter Pan collar, and has the option of adding a drawstring at the bottom.

This first version is made from pale blue pima cotton and is smocked with the design that is included in the pattern.


Made from blue Imperial Batiste, this daygown is smocked with Ellen McCarn's"Moo-Stroloy"

The last daygown is made from white satin batiste and is piped with yellow Whipped Stitched Piping. The ducks and flowers are made with simple bullion stitches and can be found on the "Bullion Duck Daygown" blog.

This daygown is just right for those expected Spring babies!

Friday, January 15, 2010

Anniversary Sale Reminder!

Don't forget about the 10th Anniversary Sale! For the whole month of January, I am having a buy 2 get 1 free sale. This includes all patterns, the new #135 Smocked Bishop pattern, and the "Heirloom Embroidery Book." After placing your order, contact me through the website and let me know which free item you would like included in your order.

Wednesday, January 13, 2010

#135 Correction!

When things are going well, I usually discover that I have goofed up! I try to laugh it off and remember that things like this keep us humble and make us human.

Because of a glitch at the printers, the first 75 copies of #135, have some seam measurements that make no sense at all. I should have caught the mistake, but I packed quickly for market and overlooked it. If you received a bad set of instructions, email me at crmichie@aol.com, and I will be happy to email or mail you the corrected instructions.
Sorry for the inconvenience and I will take comfort in the fact that 6 months from now, I won't even remember this happened!

Smocking Questions


I thought that I would answer a few smocking questions today.

1. I do not use a smocking board. I am a self taught smocker, and had smocked for years before I had ever heard of one. I know that for many smockers they are very helpful.

2. I do not usually pleat half rows, although I did when first learning to picture smock. I found them helpful, while learning to space the cables.

3. I do block my pleating before smocking. After the garment is pleated and the pleater threads are tied off, I draw up the smocking and lightly spray starch and steam (do not touch the pleats with the iron) and then allow the pleats to dry.

The final question has been, "How was market?" Fantastic! The weather had cleared and the roads were totally dry. I met many new shop owners and caught up with the old ones. I enjoyed introducing the new pattern #135, and had the sample there to show. I ate lunch with Jeannie from "Old fashioned Baby", who HAD remembered to bring her camera! And discussed, "Are you ready for Martha Pullen School yet?" with Wendy Schoen. And when I wasn't busy, I caught glimpses of new fabrics that are available for spring. I can hardly wait to see what the local stores have ordered!

LinkWithin

Related Posts with Thumbnails