Bias Bound Collar
 Now that we are officially into Fall, it was time to get busy on that corduroy fabric that I purchased several weeks ago! This cute knicker is made from pattern #103 and is made from a dusty green feather wale corduroy, and a white pique' collar which is trimmed with a bias binding.
 Here are the basic directions for adding a bias binding to any collar. This is the same technique that quilters use to finish their quilts.
 With wrong sides together, baste the collar lining to the collar. Using the seam allowance that the pattern calls for, stitch along the outer edge of the collar. Cut along the stitching line to eliminate the seam allowance.
 To make the bias strip, fold the fabric making a 45 degree angle. Press and cut along the fold line.
 Fold the fabric a second time to a 45 degree angle to the width you would like the bias binding. The width of the binding should be 4 times the desired amount of binding showing on the front of your collar. My collar has a 1/2" binding showing on the front, so the bias binding strips were 2" wide.
 Measure around the outer edge of the collar to find the length of the bias binding. With right sides together, pin and stitch the strips together using a 1/4" seam to make one long strip.
 Press the strips open, pressing the seam to one side.
 Wrong sides together, fold the bias strip in half and press.
 With the right side of the collar and the binding together, open the bias binding out and matching raw edges, pin and stitch the bias binding to the outer edge of the collar. The seam allowance will be the depth of the binding that will show on the front of the collar. For this collar a 1/2" seam was used. When stitching around a curve, ease the binding around the curve and pin and stitch in place. To turn a corner, stop stitching and back stitch the depth of the seam allowance from the edge of the collar.
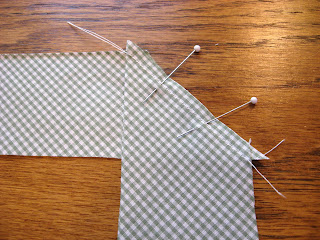
 Raise the presser foot of the machine and turn the collar. Fold the fabric back at a 45 degree angle to the back stitching.
 Extend the fold of the binding all of the way back to the raw edge. Place a pin where the two seam allowances intersect.
 Begin stitching where the pin was placed.
 There will be a loose fold at the corner. Press the fold to one side.
 Press the binding to the wrong side of the collar. Turn under the raw edge to the stitching line. Pin in place and slip stitch by hand.
 After the slip stitching is done, you collar is completed!

 Now that we are officially into Fall, it was time to get busy on that corduroy fabric that I purchased several weeks ago! This cute knicker is made from pattern #103 and is made from a dusty green feather wale corduroy, and a white pique' collar which is trimmed with a bias binding.
 Here are the basic directions for adding a bias binding to any collar. This is the same technique that quilters use to finish their quilts.
 With wrong sides together, baste the collar lining to the collar. Using the seam allowance that the pattern calls for, stitch along the outer edge of the collar. Cut along the stitching line to eliminate the seam allowance.
 To make the bias strip, fold the fabric making a 45 degree angle. Press and cut along the fold line.
 Fold the fabric a second time to a 45 degree angle to the width you would like the bias binding. The width of the binding should be 4 times the desired amount of binding showing on the front of your collar. My collar has a 1/2" binding showing on the front, so the bias binding strips were 2" wide.
 Measure around the outer edge of the collar to find the length of the bias binding. With right sides together, pin and stitch the strips together using a 1/4" seam to make one long strip.
 Press the strips open, pressing the seam to one side.
 Wrong sides together, fold the bias strip in half and press.
 With the right side of the collar and the binding together, open the bias binding out and matching raw edges, pin and stitch the bias binding to the outer edge of the collar. The seam allowance will be the depth of the binding that will show on the front of the collar. For this collar a 1/2" seam was used. When stitching around a curve, ease the binding around the curve and pin and stitch in place. To turn a corner, stop stitching and back stitch the depth of the seam allowance from the edge of the collar.
 Raise the presser foot of the machine and turn the collar. Fold the fabric back at a 45 degree angle to the back stitching.
  Extend the fold of the binding all of the way back to the raw edge. Place a pin where the two seam allowances intersect.
 Begin stitching where the pin was placed.
 There will be a loose fold at the corner. Press the fold to one side.
 Press the binding to the wrong side of the collar. Turn under the raw edge to the stitching line. Pin in place and slip stitch by hand.
 After the slip stitching is done, you collar is completed!
2 comments:
Michie, I have a baby lock machine also and have not been able to make the small piping to my liking with the zipper foot. I think the picture shows you using a cording foot? Which one is it?
rachel,
something we have used has been deep grooved 5 groove pintuck foot, but now babylock has come out with a mini piping foot.
gail
Post a Comment