Sunday, October 30, 2011

What He Wore To Church

This is what he wore to church. What I want to know is what was he thinking? Actually, I know what he was thinking..... He had been waving his fat arms around for us to pick him up and instead we put him in another outfit, propped him up, and took his picture. It might be best that we he can't talk yet!
I made the outfit out of a fun print using pattern #133. For the collar, I traced off the tee pees onto tracing paper and then scanned them to the size that I needed. I used basic embroidery stitches, so the hand work went really fast.

Our little guy is now 5 1/2 months old and weighs 16 lbs. He also has decided to skip size 6 month, so Nana Shay is really needing some extra time for sewing!

Michie'

Wednesday, October 26, 2011

The Secret To Straight Smocking Pleats

First, I thought that I would share a picture of what is happening on my design board right now. Little Emma's first Birthday is right around the corner and of course she will need something to wear for the party. The center picture on the board shows the colors and the monkey theme that mommy will be using. Everything else are snippets of possibilities that I will be using. The "Monkey Business" smocking plate is by Ellen McCarn is new on the market. Exactly what I was looking for!

And now, back to the purpose of this blog. I get asked quite often, "How do you keep your pleats straight during construction?" So, here it is......

It starts with the pleating. ALWAYS pleat extra "Holding Rows." These are pleated rows at the top and bottom of the smocked piece that will help keep the pleats from shifting during construction. You can see in the picture that the row of smocking is on Row 1 and then below that is the Holding Row. I then smock a Cable Row using two strands of floss that matches the fabric between Row 1 and the Holding Row.

The piping is then placed next to the Row 1 and covers the smocked Cable Row. If you ever do this once, you will never forget to pleat extra rows again!

You can find additional information on smocking and construction in my "Beginning Smocking Book."

Michie'

Thursday, October 20, 2011

Smocked Puppies

This picture was suppose to be of the little smocked romper that he wore to church Sunday, instead it is of his favorite toy, his feet. I think that he has springs in his legs!

So if you want to see the romper it has to be on a hanger, not on the boy. The romper is made out of blue and white Imperial Broadcloth. I had not thought of using black and white gingham for the piping until I noticed a scrap on the cutting table. That is when not having a neat cutting table pays off! :)

The smocked puppies are Ellen McCarn's "Dalmatian Puppies."

Michie'

Monday, October 17, 2011

Knitting With A Capital "K"

Anna and I had read that when you REALLY master knitting, you are a knitter with a capital "K." Yes, she is there. She started the elephant while still pregnant and finished just in time for the guy to fall in love with. And my knitting? Just like understanding football, I have once again started the fall making a commitment to learn, so we will see.

Here is the pattern.

Michie'

Friday, October 14, 2011

A Little More Information....

I really enjoyed reading the comments on the last few blogs. Sharing our sewing struggles and hints always hits a common note among us. And how exciting that Molly Jane Taylor, designer of "Beth's Little Lambs", left a comment!

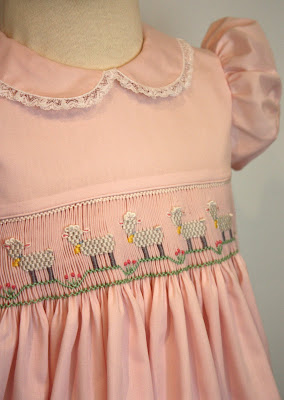
One reader asked if I could post a close up picture of the collar...... here you go! And, "What is the purpose of the gimp thread?" It pads the zigzag stitching that holds the lace in place and hides the not so pretty header of the lace.

So get your lace and fabric scraps out and give it a try! :)

Michie'


Adding Lace Edging To A Collar

Here is the promised tutorial for adding the lace edging to the collar. The lace gives the collar a soft feminine look and is easy to apply.

You will need lace edging, Gimp thread, and white light weight machine thread.

First, cut out the two collars and linings and sew them together following the pattern instructions.

Cut a piece of lace edging 1 and 1/3 the measurement of the outer edge of each collar. Gently pulling the header thread at each end of the lace, draw the lace up to fit the out edge of the collar. I like to lightly spray starch and press the lace to help hold the gathers in place.

Next, pin the lace edging to the outer edge of the collar so that the lace header barely overlaps the edge of the collar. Baste the lace to the collar by hand. This also gives you a chance to adjust the lace gathers if needed.

Place the Gimp thread on top of the lace header and using an open toed machine foot and lightweight thread, zigzag over the Gimp thread. Every machine is a little different, but I was happy with a stitch width of 2.5 and a length of 1.0. I did not do anything to hold the Gimp thread in place but just took my time and stitched a little at a time, but you may want to try one of the liquid thread products to hold it in place.

Michie'

Wednesday, October 12, 2011

A Smocking Story


Not only are some patterns considered classic because they never truly go out of style, but the same goes for smocking designs. "Beth's Little Lambs" by Mollie Jane Taylor falls into this category for me. This was the first smocking plate that I successfully picture smocked 22 years ago for Anna. I vividly remember trying to read the graph and stacking the stitches. Not to mention the thrill when I held it up and asked Rex, "What are they?" and he said, " Sheep?" It is hard to explain that level of excitement to a non-smocker!

And so it was time to pull out the pattern, pink Imperial Broadcloth, the smocking design, and floss for a dress for Emma.

I attached the lace to the edge of the collar using an old technique that I had almost forgot about. You can find the tutorial for the lace edged collar on the next blog. :)

Michie'

LinkWithin

Related Posts with Thumbnails